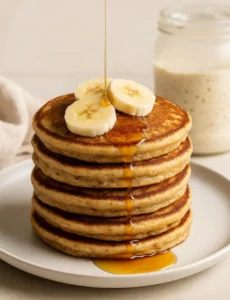
Waking up to the aroma of freshly made waffles is one of life’s simple pleasures, and with this easy sourdough waffle recipe, that dream can become your reality.
 2")
Using sourdough discard isn’t just a clever way to avoid waste; it also imparts a wonderfully complex flavor and a tender crumb to your waffles that’s simply irresistible.
This overnight method makes breakfast prep a breeze, allowing you to mix the batter the night before and cook up perfect, fluffy Belgian waffles in the morning with minimal effort. Get ready to transform your breakfast routine with these delightful, golden-brown treats!
Table of Contents
- What You’ll Love About This Quick And Easy Recipe
- Everything You Need To Make This Recipe Without Stress
- Time Needed From Start To Finish
- How To Make It Step By Step With Visual Cues
- Easy Variations And Serving Ideas That Fit Real Life
- Common Slip-Ups And How To Avoid Them
- How To Store It And Make It Ahead Without Ruining Texture
- Questions People Always Ask Before Making This Recipe
Easy Sourdough Discard Waffles (Overnight Recipe)
Ingredients
Method
- 1. Prepare the Overnight Batter: In a large mixing bowl, combine the sourdough discard, all-purpose flour, granulated sugar, baking soda, baking powder, and salt. Whisk these dry ingredients together thoroughly to ensure everything is evenly distributed.
- 2. Add Wet Ingredients (Except Eggs and Vanilla): Pour in the whole milk and the melted butter. Stir until just combined. The mixture will be thick and shaggy at this point. Cover the bowl tightly with plastic wrap or a lid and place it in the refrigerator. Let it rest overnight for 8 to 12 hours.
- 3. Morning Preparation: The next morning, remove the batter from the refrigerator. It will be very thick and bubbly. In a separate small bowl, whisk together the two large eggs and vanilla extract until well combined.
- 4. Combine and Adjust: Add the egg and vanilla mixture to the cold waffle batter. Stir gently until just incorporated. Do not overmix; a few lumps are perfectly fine. The batter should be thick but pourable. If it seems too thick, you can add a tablespoon or two of milk to reach your desired consistency.
- 5. Preheat Your Waffle Iron: Plug in your Belgian waffle iron and allow it to preheat fully. Most waffle irons have an indicator light that signals when it’s ready. Lightly brush or spray the waffle grids with a little extra melted butter or non-stick cooking spray to prevent sticking.
- 6. Cook the Waffles: Pour about 1/2 to 3/4 cup of batter onto the hot waffle iron, depending on the size of your machine. Close the lid and cook according to your waffle iron’s instructions, typically for 3-5 minutes, or until the waffles are golden brown and crisp. The steam will usually stop escaping when they are done.
- 7. Serve Immediately: Carefully remove the cooked waffle from the iron using a fork or tongs. Place it on a wire rack to keep it crisp while you cook the remaining batter. Serve warm with your favorite toppings.
Nutrition
Notes
– Store leftovers covered in the fridge for 3-4 days.
– Freeze for up to 2 months.
– Reheat gently for best texture.
Loved this recipe?
Leave a rating & comment. how it was!What You’ll Love About This Quick And Easy Recipe
This recipe is a game-changer for anyone who loves the idea of homemade waffles but needs a practical, family-friendly approach. It’s perfect for busy mornings because the bulk of the work happens the night before. You’ll wake up to a ready-to-go batter, meaning fresh waffles can be on the table in minutes. The sourdough discard adds a subtle tang and incredible depth of flavor that elevates these beyond your average waffle, without requiring you to be an expert baker. This recipe is ideal for weekend brunches, special occasion breakfasts, or simply when you want to treat your family to something extra delicious without a lot of fuss. It’s also a fantastic way to use up that sourdough discard that often accumulates, turning it into something truly spectacular.
Everything You Need To Make This Recipe Without Stress
Gathering your ingredients ahead of time makes the cooking process smooth and enjoyable. Most of these items are likely already in your pantry and refrigerator, making this a convenient recipe to whip up on short notice. We’ll be using standard kitchen staples, ensuring you won’t need to hunt for any obscure specialty items.
INGREDIENTS:
 4")
- 1 cup sourdough discard (unfed, at room temperature)
- 1 1/2 cups all-purpose flour
- 2 tablespoons granulated sugar
- 1 teaspoon baking soda
- 1 teaspoon baking powder
- 1/2 teaspoon salt
- 1 1/2 cups whole milk
- 1/2 cup melted unsalted butter, plus extra for greasing
- 2 large eggs
- 1 teaspoon vanilla extract
For the all-purpose flour, any standard brand will work well. If you prefer, you can use a 1:1 gluten-free flour blend, though the texture might vary slightly. When it comes to milk, whole milk provides the richest flavor and best texture, but 2% milk can also be used. For the butter, unsalted is preferred so you can control the salt content, but if you only have salted, simply reduce the added salt in the recipe by half.
Time Needed From Start To Finish
This recipe is designed for convenience, with the majority of the waiting time happening overnight while you sleep.
- Active Prep Time: 10-15 minutes (for mixing the batter the night before)
- Resting Time: 8-12 hours (overnight in the refrigerator)
- Cooking Time: 3-5 minutes per waffle (depending on your waffle iron)
- Total Time: Approximately 8 hours 20 minutes to 12 hours 20 minutes (mostly inactive)
How To Make It Step By Step With Visual Cues
 5")
Making these sourdough waffles is incredibly straightforward. Follow these steps for perfect results every time.
- Prepare the Overnight Batter: In a large mixing bowl, combine the sourdough discard, all-purpose flour, granulated sugar, baking soda, baking powder, and salt. Whisk these dry ingredients together thoroughly to ensure everything is evenly distributed. This is a crucial step for consistent leavening.
- Add Wet Ingredients (Except Eggs and Vanilla): Pour in the whole milk and the melted butter. Stir until just combined. The mixture will be thick and shaggy at this point. Cover the bowl tightly with plastic wrap or a lid and place it in the refrigerator. Let it rest overnight for 8 to 12 hours. This long rest allows the sourdough discard to work its magic on the flour, developing flavor and texture.
- Morning Preparation: The next morning, remove the batter from the refrigerator. It will be very thick and bubbly. In a separate small bowl, whisk together the two large eggs and vanilla extract until well combined.
- Combine and Adjust: Add the egg and vanilla mixture to the cold waffle batter. Stir gently until just incorporated. Do not overmix; a few lumps are perfectly fine. The batter should be thick but pourable. If it seems too thick, you can add a tablespoon or two of milk to reach your desired consistency.
- Preheat Your Waffle Iron: Plug in your Belgian waffle iron and allow it to preheat fully. Most waffle irons have an indicator light that signals when it’s ready. Lightly brush or spray the waffle grids with a little extra melted butter or non-stick cooking spray to prevent sticking.
- Cook the Waffles: Pour about 1/2 to 3/4 cup of batter onto the hot waffle iron, depending on the size of your machine. Close the lid and cook according to your waffle iron’s instructions, typically for 3-5 minutes, or until the waffles are golden brown and crisp. The steam will usually stop escaping when they are done.
- Serve Immediately: Carefully remove the cooked waffle from the iron using a fork or tongs. Place it on a wire rack to keep it crisp while you cook the remaining batter. Serve warm with your favorite toppings.
Easy Variations And Serving Ideas That Fit Real Life
These sourdough waffles are incredibly versatile and can be customized to suit any taste or occasion. For a fun twist, consider adding 1/2 cup of chocolate chips or fresh blueberries to the batter just before cooking. Kids especially love these additions! You can also stir in a teaspoon of cinnamon or a pinch of nutmeg for a warm, spiced flavor.
When it comes to serving, the possibilities are endless. Classic maple syrup and a pat of butter are always a hit. For a more indulgent breakfast, top with whipped cream and fresh berries. A dollop of Greek yogurt and a drizzle of honey offers a healthier option. For a savory brunch, serve alongside crispy bacon, scrambled eggs, and a sprinkle of chives. These waffles also make a fantastic base for chicken and waffles – the slight tang from the sourdough pairs beautifully with fried chicken.
Common Slip-Ups And How To Avoid Them
Even simple recipes can have a few pitfalls. Here’s how to ensure your sourdough waffles turn out perfectly every time:
- Overmixing the Batter: This is a common mistake that can lead to tough waffles. Once you add the wet ingredients, stir only until the flour streaks disappear. A few lumps are fine and actually preferred.
- Not Preheating the Waffle Iron Enough: A cold or insufficiently heated waffle iron will result in pale, soggy waffles that stick. Always wait for the indicator light to signal that it’s fully preheated before adding batter.
- Opening the Waffle Iron Too Soon: Resist the urge to peek! Opening the iron before the waffle is fully cooked can cause it to tear and stick. Wait until the steam largely subsides, which is a good indicator of doneness.
- Using Too Much or Too Little Batter: Too much batter will overflow and create a mess, while too little will result in small, incomplete waffles. Start with 1/2 cup and adjust as needed for your specific waffle iron.
- Not Greasing the Waffle Iron: Even non-stick waffle irons benefit from a light greasing, especially for the first waffle. This prevents sticking and helps achieve that beautiful golden-brown crust.
How To Store It And Make It Ahead Without Ruining Texture
This recipe is designed for make-ahead convenience, primarily through the overnight batter rest. However, you can also prepare and store cooked waffles for future enjoyment.
Storing Cooked Waffles: Allow cooked waffles to cool completely on a wire rack to prevent sogginess. Once cool, you can store them in an airtight container in the refrigerator for up to 3-4 days. For longer storage, freeze them in a single layer on a baking sheet until solid, then transfer to a freezer-safe bag or container. They will keep well in the freezer for up to 2 months.
Reheating Waffles: The best way to reheat waffles and restore their crispness is in a toaster, toaster oven, or even a regular oven. From the refrigerator, toast or bake at 350°F (175°C) for 5-7 minutes. From frozen, increase the time to 10-15 minutes, or until heated through and crisp. Avoid using a microwave, as it will make them soft and chewy.
Questions People Always Ask Before Making This Recipe
Can I use active sourdough starter instead of discard?
While you technically can, this recipe is specifically formulated for sourdough discard (unfed starter). Using active starter might result in a slightly different texture and tang, and you might need to adjust the leavening agents (baking soda/powder) slightly. Stick to discard for the intended results.What if my sourdough discard isn’t at room temperature?
It’s best if your discard is at room temperature as it mixes more easily and integrates better with the other ingredients. If it’s straight from the fridge, let it sit out 6")
FAQs
- Can I make these ahead? Yes—prep ahead, refrigerate, then serve when ready.
- How long do leftovers last? Store covered in the fridge for 3–4 days for best texture.
- Can I adjust sweetness? Yes—add more or less sweetener to taste.
- Can I change the fruit? Yes—swap strawberries for blueberries, raspberries, or sliced banana.